What is Push Notification?
Basically, a push notification is an alert that pops up on the smartphone that prompts you to do something the calls you to action it allows you to speak directly to app users the right time and at the right place.
Push notifications are a way that if you have users who have installed your app haven’t used in a long time, as the way to reach out to them.
It’s also a way to just send notification to people, whether or not they have your app open or not and in terms of clients that use it for the alarm and stuff to notify their staff or certain things and it’s kind of thing which we have not used in our own apps, but we have used it for a lot of client apps.
How Do Push Notifications work?
When you set the push notification you basically, like for apple you would set up for your i-phone, you have to give it push notification entitlement and you also have to set up the certificate and you have to do the same thing with Firebase cloud messenger or FCM network.
So you have FCM or the APN as apple push notification services.
First, open up your application and if registered it with those, it will automatically go to those services and register and then the user will be asked “do you want ear spy to be able to send message” and you say “Yes” or “No” and it gets a token back from them.\
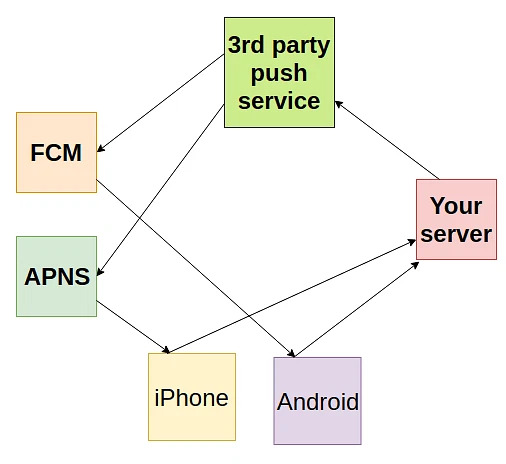
Now for a lot of the apps that we have done, at the point, we have to hold on that notification because that its own doesn’t really help anybody.
You need to be able to have a way to push those messages to them, and lots of times that means you have your own server.
Some of the application that has done for in the past, it would be like, they open up the app, the user opens up the applications, it goes to either APNs, or the FCM networks and windows has their own too.
It goes to those token and it comes back with that token and then you could take that token and then you could take that token and wait until they login or register and once they do that, at that point you can associate that user with that push notification or if you don’t care who the user is and you just broadcast everything to everybody or based on location or whatever you could do it before asking their details.
So the point, you can take that token along with the log-in details and put that to your server and then at that point you can have your own server send the notification to the APNS or the FCM and then that handles sending it to the user.
This kind of flow the way that it goes and gets a bit complicated.
If you have a cross-platform app like saying it’s available to the user on android and on iPhone you have to think about which phone are they actually using.
For example:
Everytime user would log-in we would take that last push notification things and we would overwrite a single field in the database and we have to say if it was android or iPhone.
So for people who had a tablet and a phone if they registered with their phone first and then their tablet the phone would no longer get the push notification and associating any multiple devices with that user.
Now there are lots of services out there take care of it for you. There is firebase, airpush, Amazon has one called SNS – Simple Notification Services which they take all that complexity away for you, managing who belongs to what.
Microsoft Azure has one called “notification hub”.
A lot of things that we used and they seem like a bit of overkill because you don’t really need them and a lot of times they will charge, but it’s usually really low.
You can use with multiple chat applications, so let’s say mona is on the phone and Chris wants to send a chat to his friend who also has the app installed, Chris’s could select him, send the push notification that would go to the server, the server would see his friend and that would look up the friends token ID, lookup the send message to the apple push notifications ot the FCM and that would send it back to his phone.
In terms of marketing, people have used push notifications in terms of marketing, because theoretically, person have thought about doing it so we could we use analytics track how often the app is being used and we could say: for each user who has the use the app, who has uninstalled it but has not used the app last month, maybe we can send them a push notification just to say something relevant.
How to configure Push Notification in your application?
Before you start you need a few things to set up
Xcode 9.2 or later
For Cloud Messaging:
- A physical iOS device.
- An Apple Push Notification Authentication Key for your Apple Developer account.
- In Xcode, enable Push Notifications in App → Capabilities.
How to add Firebase to your app?
- Go to the Firebase console
- Click Add project, then select or enter a Project name.
– If you have an existing Google project associated with your app, select the project from the Project name drop-down menu.
– If you don’t have an existing Google project, enter a new Project name.
Great stories have a personality. Consider telling a great story that provides personality. Writing a story with personality for potential clients will assist with making a relationship connection. This shows up in small quirks like word choices or phrases. Write from your point of view, not from someone else's experience.
Great stories are for everyone even when only written for just one person. If you try to write with a wide, general audience in mind, your story will sound fake and lack emotion. No one will be interested. Write for one person. If it’s genuine for the one, it’s genuine for the rest.
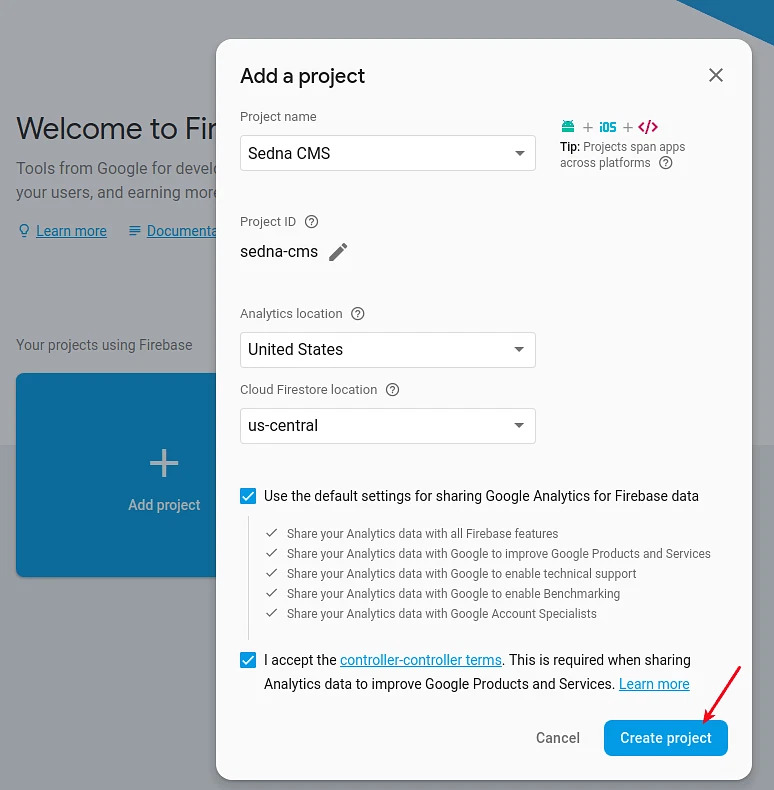
- Follow the remaining setup steps, then click Create project.
Now that you have a project, you can add your iOS app to it:
- Click Add Firebase to your iOS app and follow the setup steps. If you’re importing an existing Google project, this may happen automatically and you can just download the config file.
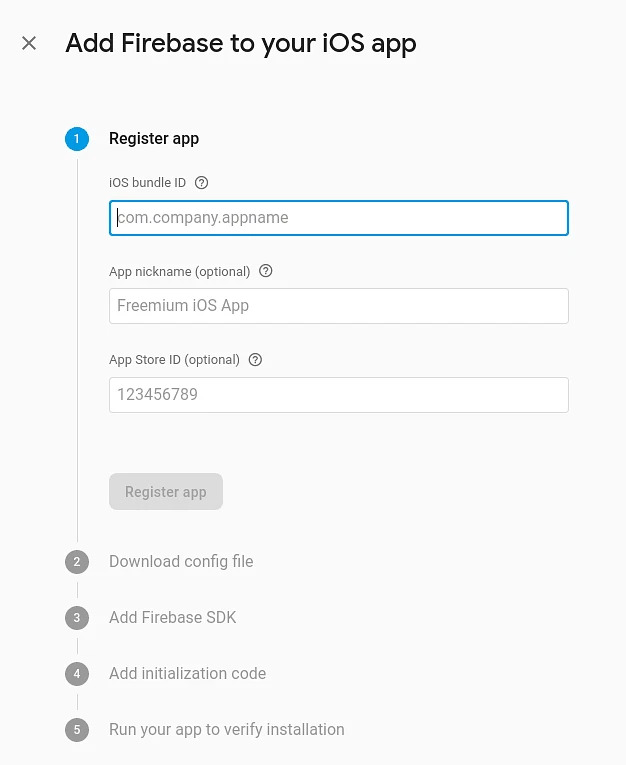
- When prompted, enter your app’s bundle ID. It’s important to enter the bundle ID your app is using; this can only be set when you add an app to your Firebase project.
- During the process, you’ll download a GoogleService-Info.plist file. You can download this file again at any time.
- Add GoogleService-Info.plist in the root directory of tour project.
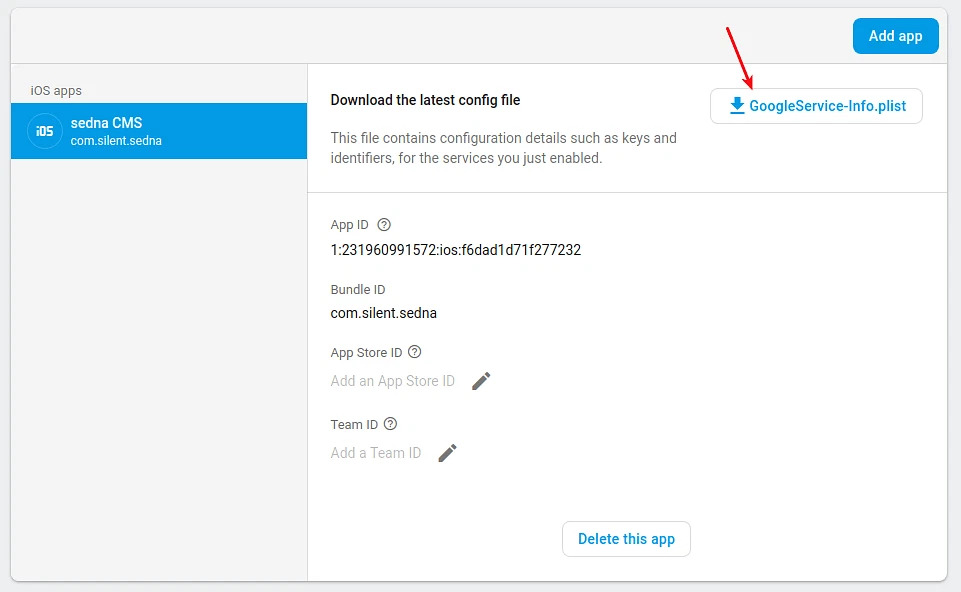
Configuring APNs with FCM
Create the authentication key
- In your developer account, go to Certificates, Identifiers & Profiles, and under Keys, select All.
- Click the Add button (+) in the upper-right corner.
- Enter a description for the APNs Auth Key.
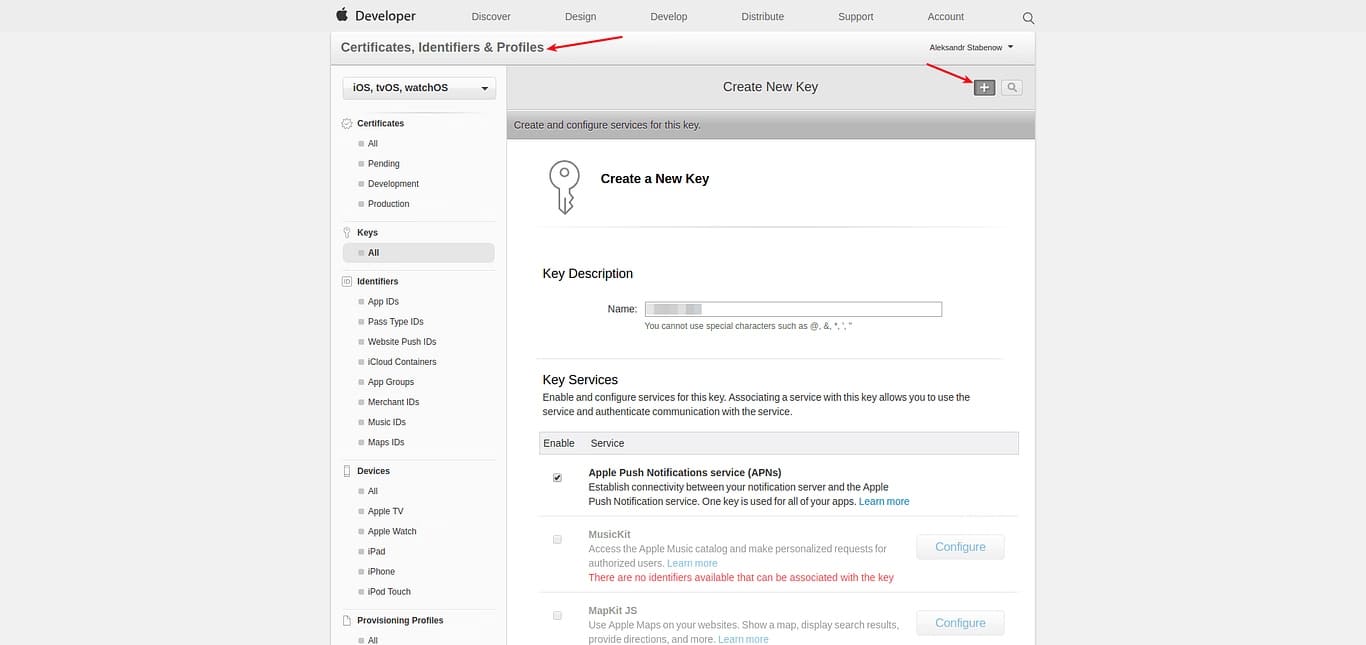
- Under Key Services, select the APNs checkbox, and click Continue.
- Click Confirm and then Download. Save your key in a secure place. This is a one-time download, and the key cannot be retrieved later
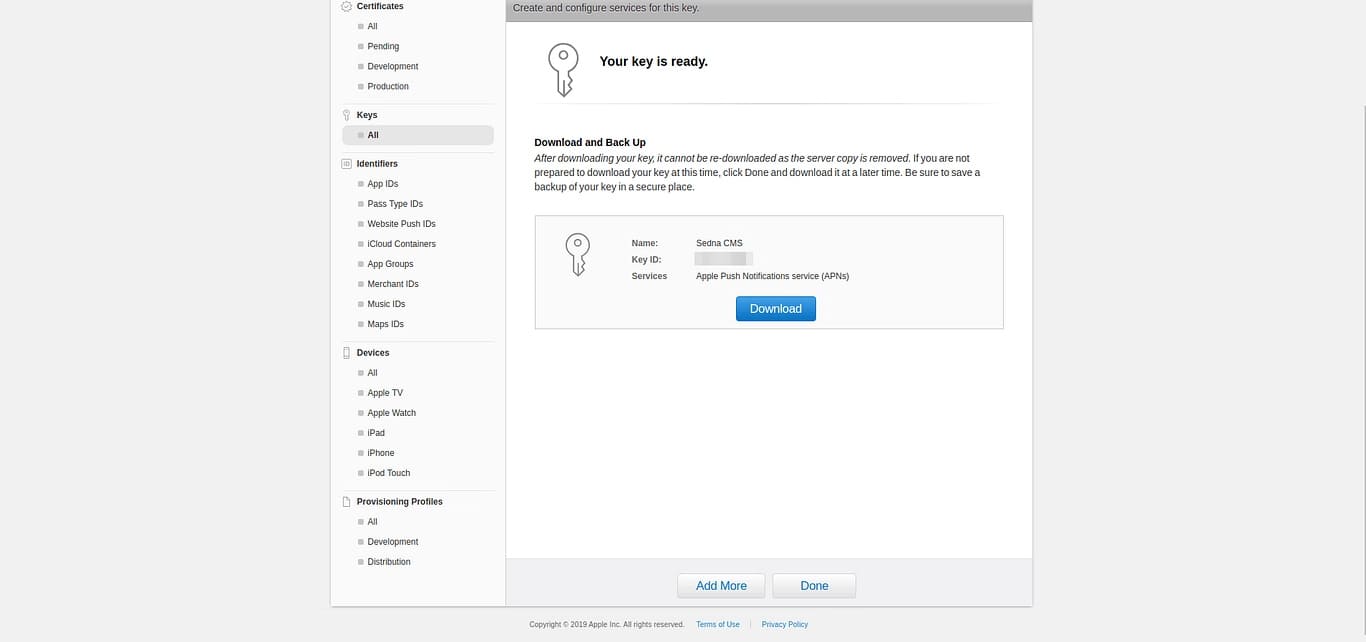
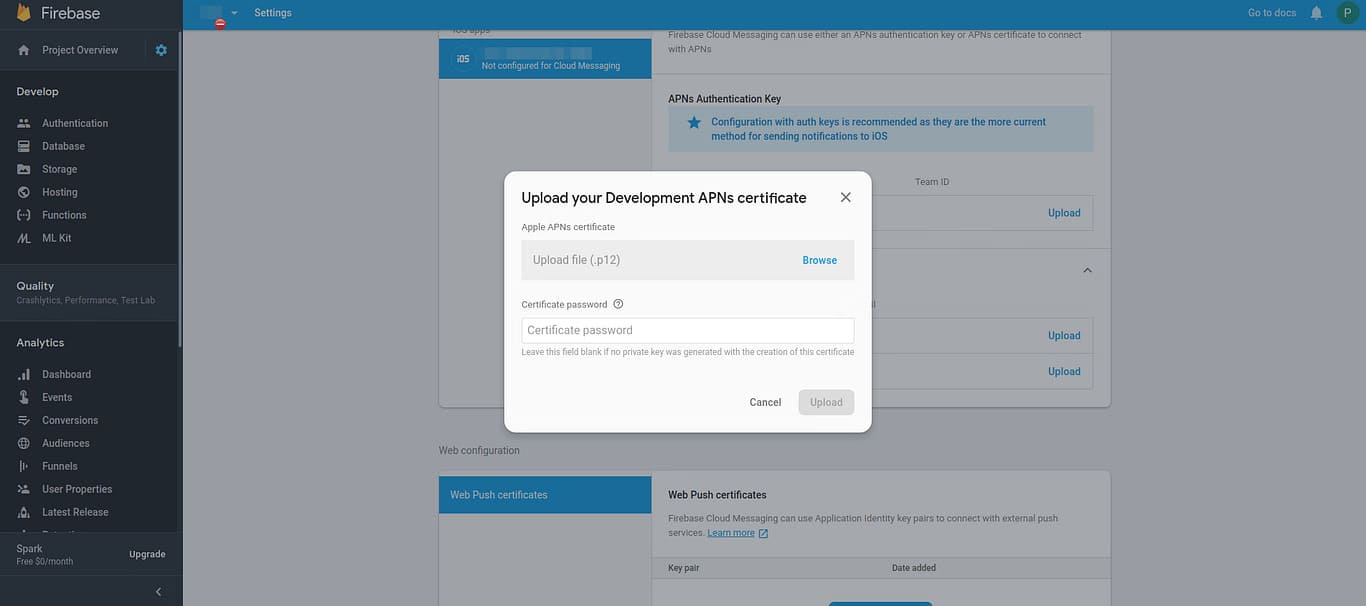
This Upload Auth key in firebase iOS APP
Firebase Console -> Project -> Settings -> Cloud Messaging -> iOS app configuration
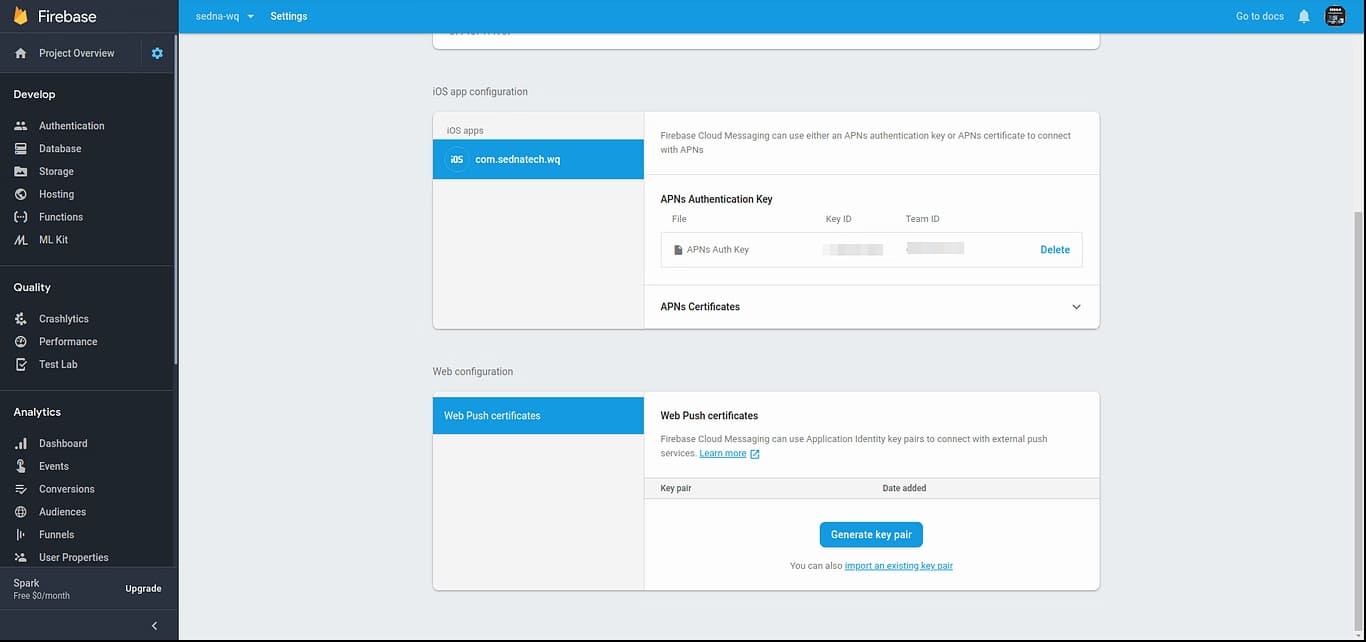
Configure an App ID for Push Notifications
To send Push Notifications to an iOS App, you must configure its App ID to do so.
- In the list of iOS App IDs, select the one you want to use, then click Edit.
- In the Push Notifications section, you can create a Client SSL certificate for the development or production environment. Create one for development clicking Create Certificate… in the Development SSL Certificate section.
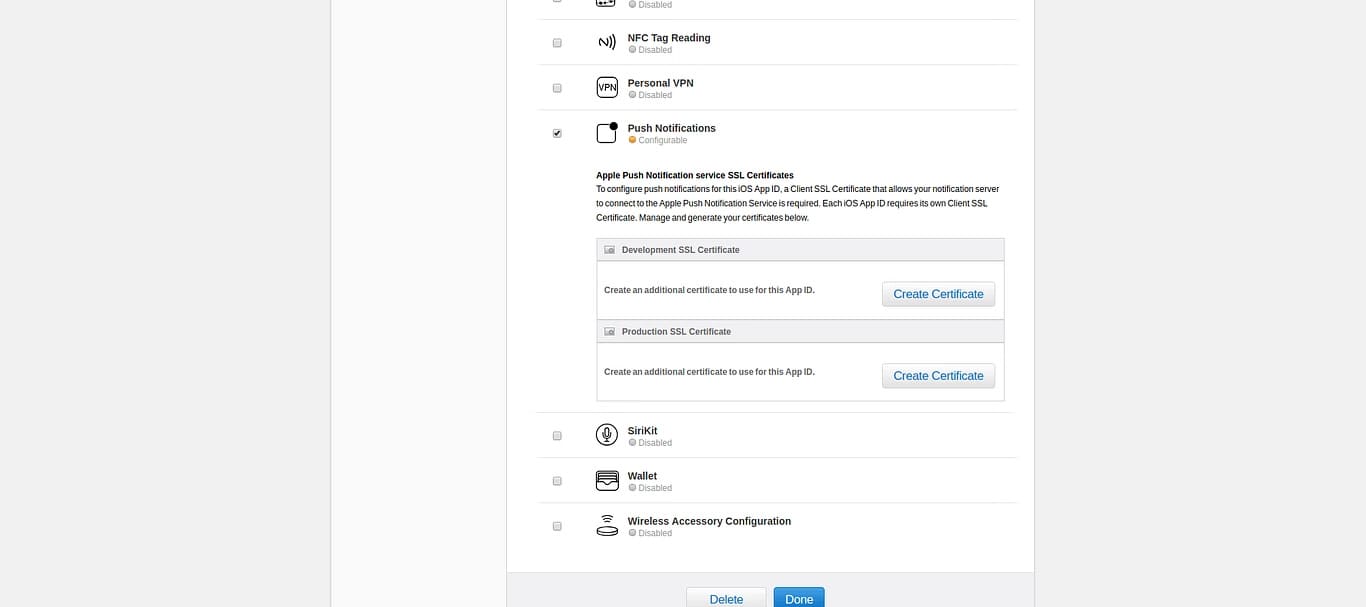
- You should now see a section called About Creating a Certificate Signing Request (CSR) that contains information about creating a CSR. Click Continue.
- You should now be in the Generate section of the flow. Click Choose File… and select the .certSigningRequest file that you created before, then click Generate when it becomes active.
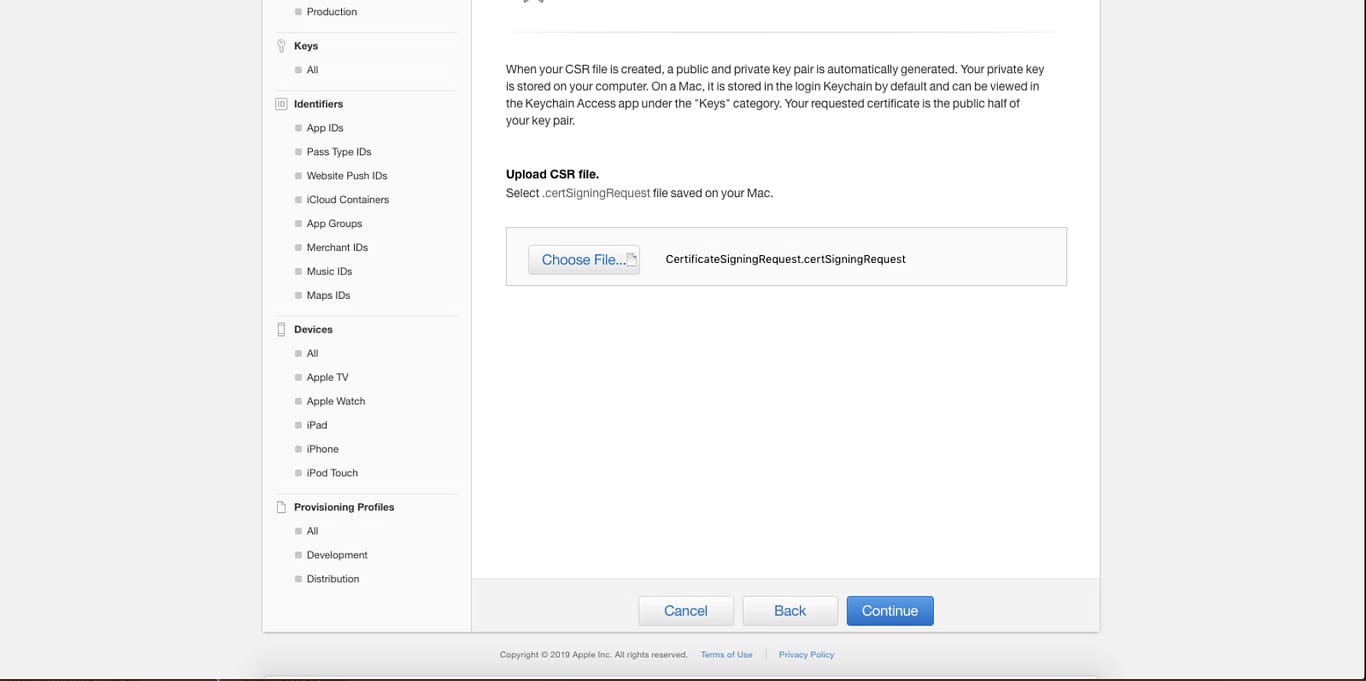
When the SSL certificate is ready, click Download to save it to your Mac, and click Done to close the certificate creation flow.
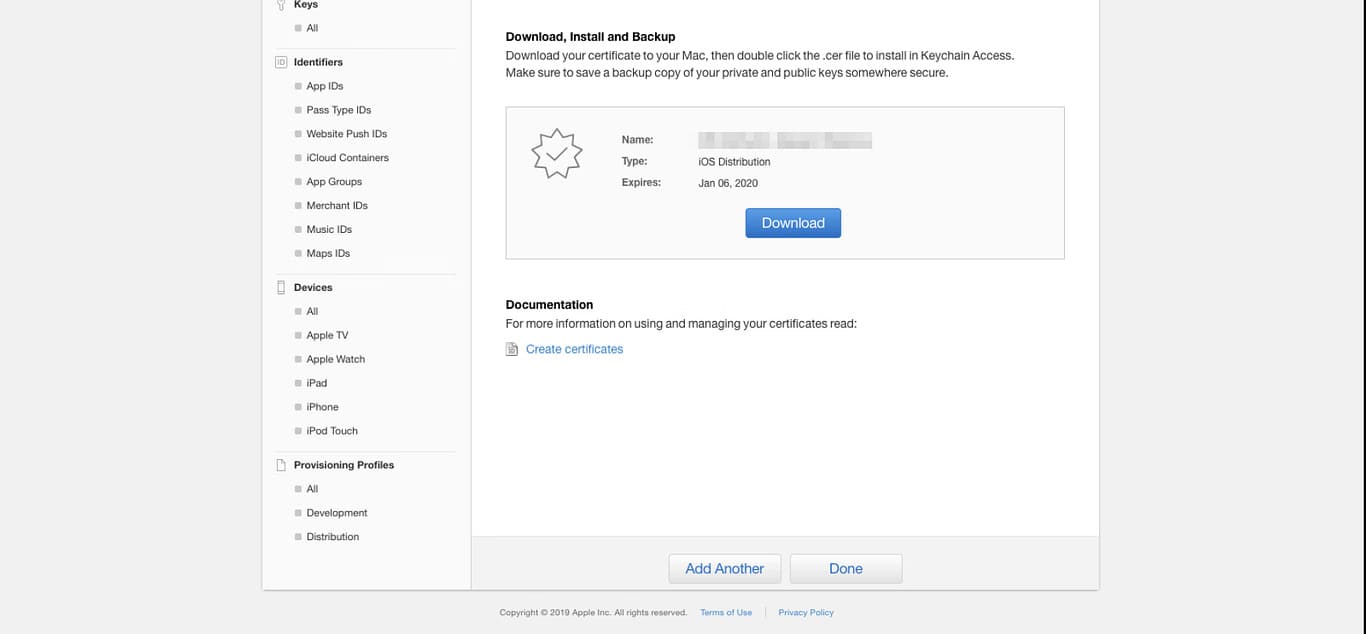
- On your Mac, locate the downloaded SSL certificate and double-click it to install it in your keychain.
- On your Mac, open Keychain Access. Under My Certificates, locate the certificate that you have just added; it should be called Apple Development IOS Push Services: your.bundle.id.
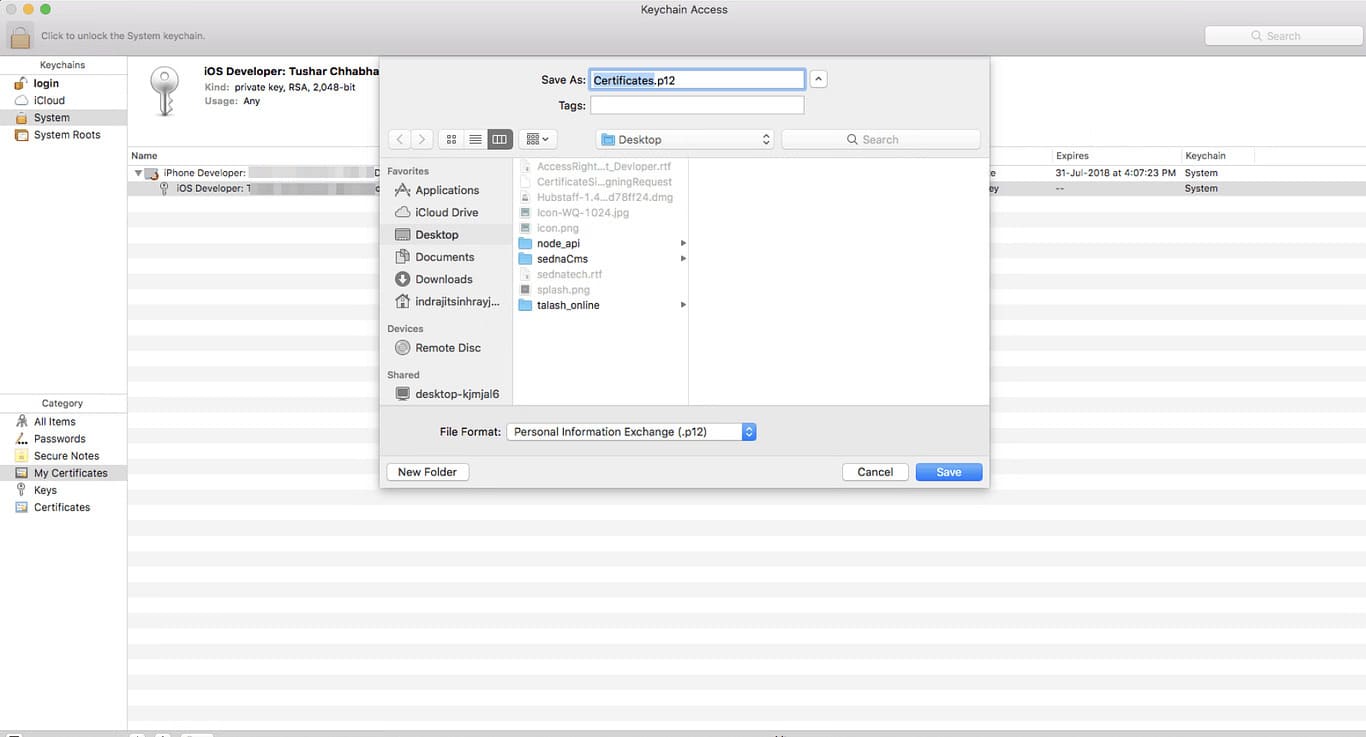
- Right-click on the certificate, select Export Apple Development IOS Push Services: your.bundle.id and save it as a .p12 file. Enter a password to protect the exported certificate if you want.
